


Flutter, Google’s new cross-platform SDK, is familiar to people who work with mobile apps. On February 27, Flutter’s beta was announced. It wasn’t until recently that Flutter’s first release preview was public, though. Learn How to use Flutter to build an app with a bottom navigation bar.
What is Flutter?
First, let’s talk about what Flutter is. The Flutter SDK comes with a full framework that includes all the widgets and tools you need to make apps that work on both Android and iOS. What makes it different from other cross-platform frameworks like React Native and Xamarin is that it doesn’t use native widgets or web views. There is a separate rendering engine for Flutter, which is written in C or C++. Dart code that is written for the actual writing of the Flutter apps can compile into native code for each platform. This means that the apps work well on each platform. Flutter has a great hot reload feature that makes it easier to make apps that run. When a developer can hot reload their code, changes appear immediately on their devices or simulators instead of needing to wait for the code to build.
How to build an app and bottom navigation in flutter
Let’s get started building our app now that we know what Flutter is. Flutter SDK can be downloaded from the Flutter website if you haven’t already done so. Run the command flutter and create my app to begin building your app. To use Swift or Kotlin in your app, you can execute flutter create -i swift/kotlin my app on the command line. If you are using Visual Studio Code, install the Dart plugin. If you are using Android Studio, install Flutter and Dart. Flutter’s documentation is a great resource if you need help setting up your editor.
Step 1: Identify our port of entry
To begin, open the lib/ directory and look for the main.dart file. Then, since we’ll be starting from scratch, remove all the code from that file. Our application begins with this file. Make sure to include a heading that says:
_11zon.webp)
When using this, you’ll have access to everything in the Flutter SDK’s material design widgets. Check out the widget catalogue if you want to see all the widgets available.
To complete the import declaration, we need to write our main method.

Don’t be alarmed if you have problems after you use the main method. We can’t run the app because the App widget class we are giving to the runApp function hasn’t been built yet. When you use the runApp function, a Widget class is sent in to be the root widget.
[Also read: Why Should Android & iOS App Developers Consider Flutter]
Now, make a widget for our App. Still in the main part of town. Putting it in at the end with a dash.
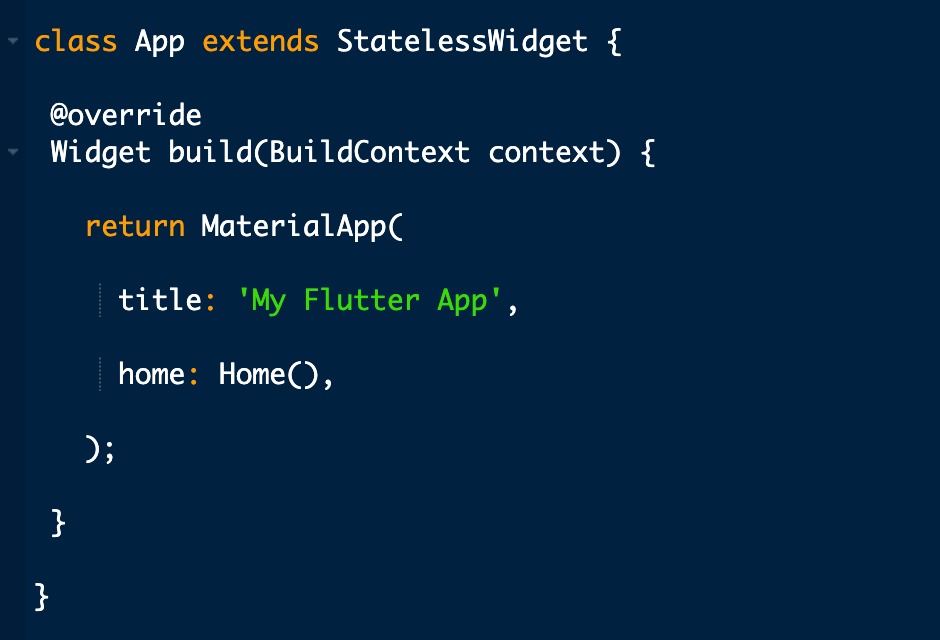
As a result, a new stateless widget named App is generated and used throughout the application. Because they do not rely on state changes, stateless widgets are possible to create. All StatelessWidgets are required to install the create method, which is where we develop our user interface. Create a Material App and set the home property to the page or widget in the App Widget that represents the start of your app. We’ll be able to specify the location of our home with the help of our Home widget.
Step 2. Create the home page
Create a new.dart file called home widget in the lib folder and save it in the current directory. It is necessary to re-import the material widgets that are located at the top of this file.
_11zon.webp)
Afterwards, we’ll construct a widget that will serve as our main navigation bar. We’ll make a new Stateful Widget for this purpose. Your user interface can alter depending on the current state of your application, and stateful widgets can help you do this. If we use a bottom navigation bar, for example, our Home widget will display a different widget depending on which tab is being used at any one time. Add the following code to your import statement to get started.
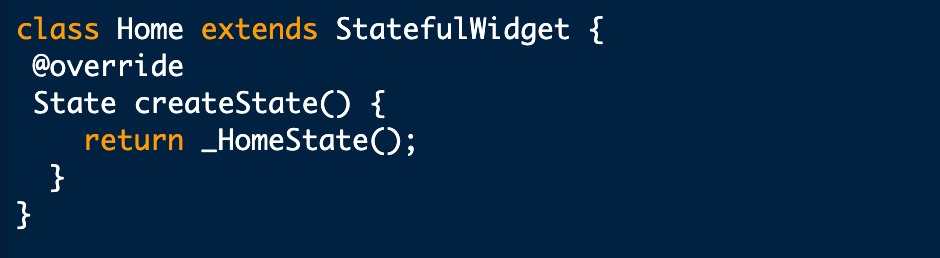
You might notice that this widget class doesn’t have the build method that we talked about earlier. When it comes to StatefulWidgets the build method is implemented in the widget’s corresponding State class. The only thing that is needed in a StatefulWidget is the create State method we made above. We just return an instance of our _HomeState class. Class names with a “_” in front of them is how Dart marks them as private. We now need to make the class for our home widget’s state, so we can make it. Add this line to the end of your home widget.dart file, then save it.

Our app should now work. There are three ways you can do this: You can press F5 on a Dart file in the Visual Studio Code, click the run button in Android Studio, or type flutter run in your terminal. If you need help setting up an emulator or simulator to run your app, go back to Flutter’s documentation and read through it again. A good app should look like this.
Great! We have an app running that has a nice bottom navigation bar that makes it easy to get around. But, there is one thing that could go wrong. When we use our navigation bar, it doesn’t go anywhere. LET’S FIX IT NOW!
[Also read: Flutter vs React Native]
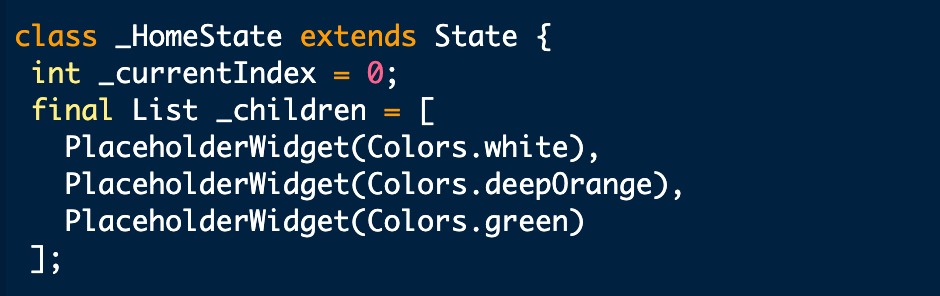
Step 3. Make sure you can get around.
In the home widget.dart file, go back to the _HomeState class. We need to make some changes. We need to add two new properties to the class at the top.

In the first place, it will keep track of our current tab’s index, while the second will hold a list of the widgets we wish to display based on the current tab.
After that, we’ll use these properties to instruct our widget on what to display when a new tab is tapped. To do this, we must change the scaffold widget returned by our build method. The following is a demonstration of our innovative approach of construction of bottom navigation bar and flutter icons.
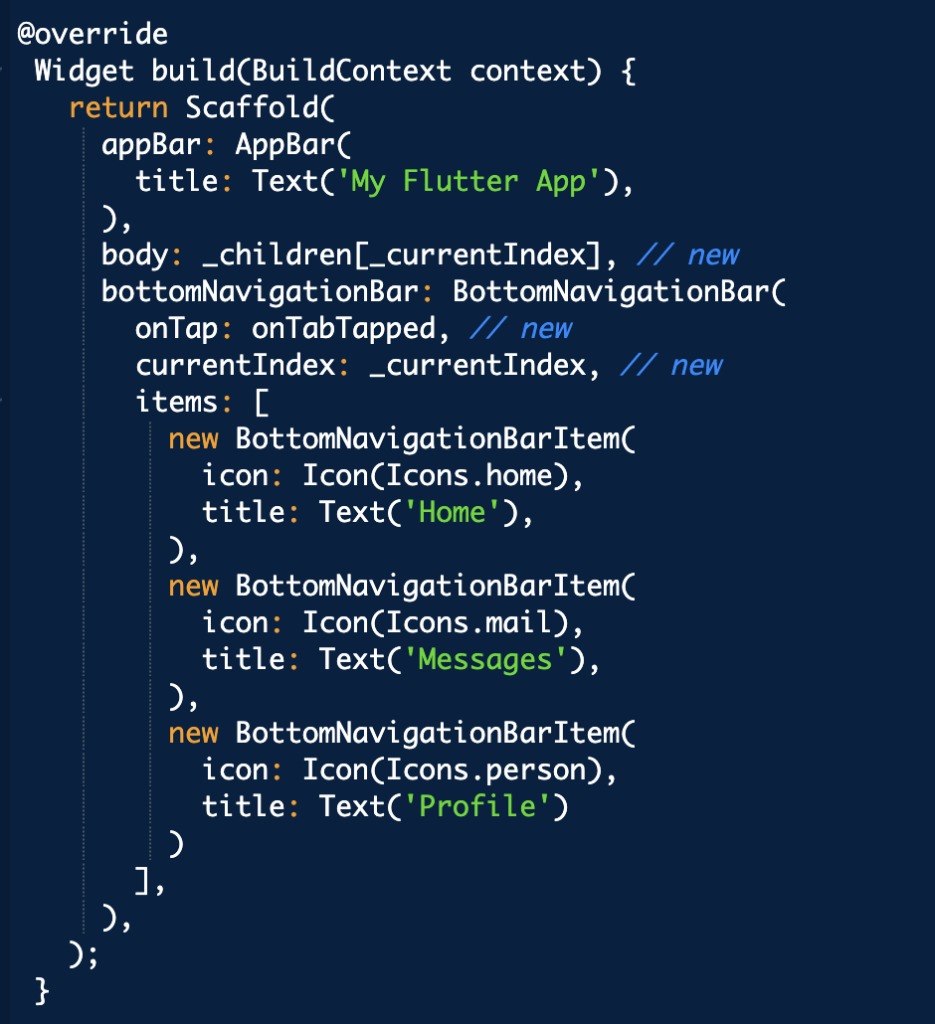
There are three new lines of code in our build procedure marked by // new. The body of our scaffold is the widget that appears between our app bar and the bottom navigation bar in Flutter. In our _children widget list, we set the body to the same value as the widget that corresponds. This was followed by a quick addition to the flutter navigation bar’s onTap event handler In this case, we set it equal to an event handler that takes in the tab index and decides what to do with it. We’ll have this feature up and running in a jiffy. Lastly, we changed the value of the bottom navigation bar’s currentIndex property to reflect the value of the _currentIndex field in our state.
Step 4: Organise your navigational resources.
That onTabTapped method we described earlier will now be added. The following function should be added to our _HomeState class at the bottom navigation bar.
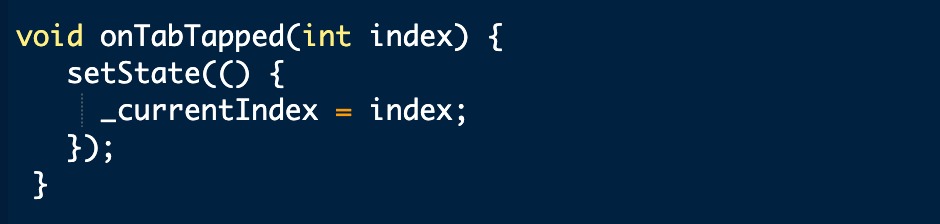
This function executes set State on our state class using the index of the tapped tab. In this case, the construction method will be re-run with the input state. When we deliver the revised tab index, we’ll edit the body of our scaffold widget and animate our bottom navigation bar to the appropriate tab.
Step 5. Add the child widgets
We are nearing the end of our app’s development. The widget for our _children widget list will be made and added to the navigation in flutter as the final stage. Create a new.dart file called placeholder widget.dart in your lib folder. StatelessWidget with background color is what this file is for.
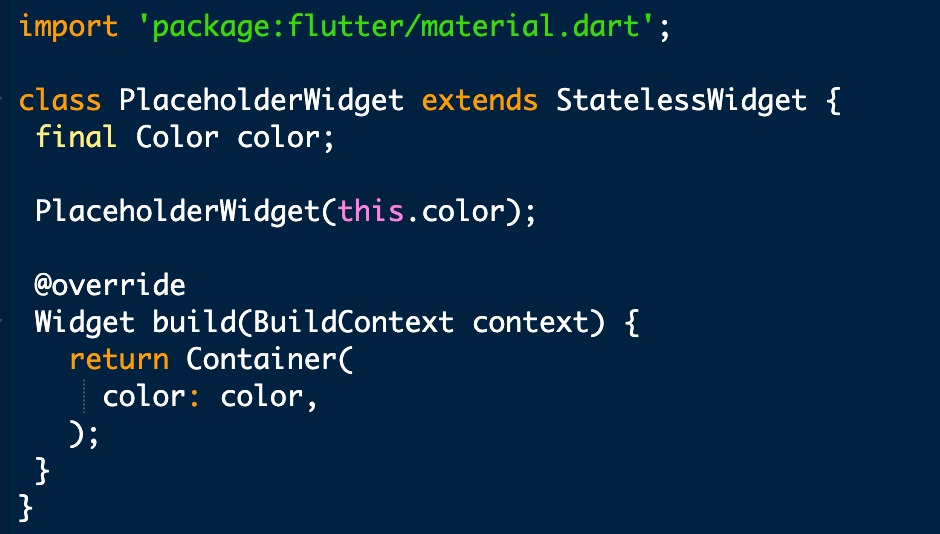
Just add the PlaceholderWidget to the navigation bar app and we’re done. We need to import our widget at the top of our home widget.dart file, so let’s get started.

Add these widgets to our _children list, and they’ll appear when we open a new window.
That’s it! You should now be able to run your app and switch between tabs. If you want to see Flutter’s hot reload feature in action, then try changing any of your Flutter Bottom Navigation Bar Items. It’s worth noting that changing the colors passed into our PlaceholderWidgets will not be reflected during a hot reload because Flutter will maintain the state of our StatefulWidget.
Conclusion
In this lesson on how to make a new Flutter app development, a bottom navigation bar was shown. Cross-platform tools like Flutter, which speed up development, are becoming more and more popular in the mobile world.
Flutter, unlike other frameworks, doesn’t use widgets or WebViews that are specific to each platform.
There is a big problem with Flutter right now because third-party support for features isn’t very good yet. Flutter is still a work in progress as a tool for making beautiful apps that work on different devices.


