


Do you already know the basics of Java and want to use Android Studio to make your first java app? With 2.89 million Android apps in the Play Store right now and more being added every minute, it’s a great idea to learn and eventually master Android app development.
Learn how to make android apps using Android Studio.
You need an Integrated Development Environment (IDE) to make an Android app, and Android Studio is the official IDE for making Android apps.
Install Android Studio
Check out my post on How to Use Android Studio to learn how to install and start using Android Studio.
Understand Android Studio
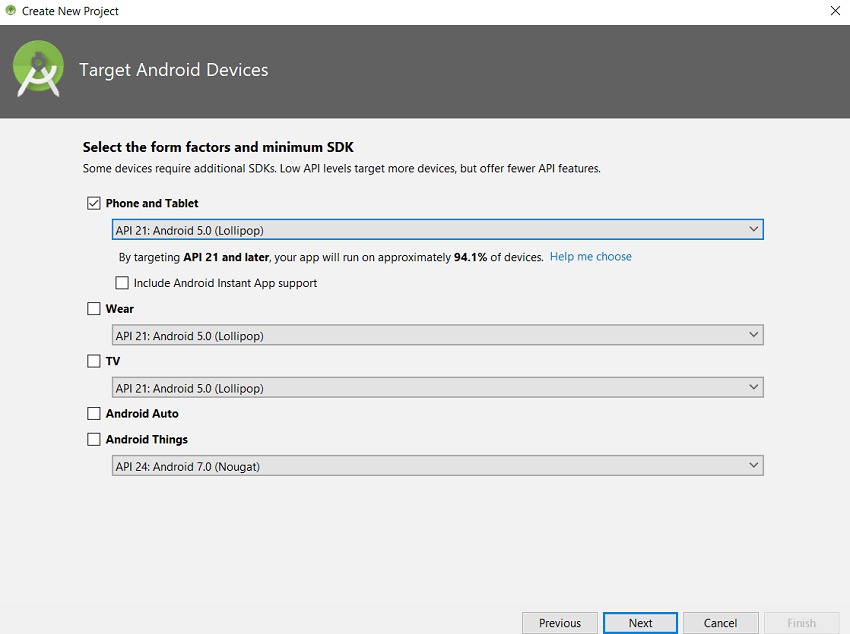
Create your first Android project now that Android Studio is ready to use. Give your project a name and a unique name for its package. Then, choose the least SDK version you want your java app to work with.
As it says under the Minimum SDK bar, the features you can use in your java app get better with each API level. But your java app will work on less hardware. In the Create New Project dialogue, there is an estimate of how many devices will be able to run your java app.
After that, you’ll be prompted to make a decision on the app’s design. Let’s go with Empty Activity so that we can experiment and learn a lot.
_11zon.webp)
It will take a few seconds for Android Studio to generate your first project when you name your activity MainActivity. Using this code editor, you can now begin writing the actual code that will power your java app.
_11zon.webp)
Code for your programme is written here in the large portion on your right. The tool windows are located to the left and below that. Using them, you may perform a particular job on your project, such as accessing files or looking for error information, quickly and efficiently.
Besides the Navigation Bar, which allows you to move about your project and the currently opened class file, Android Studio’s Toolbar also helps you execute typical operations like creating, running and debugging apps.
Take a look at the screen for a while. Once you begin developing Android apps with Java, it will all begin to make sense.
It’s time to create your first Java on Android app with Android Studio now that you’ve mastered the basics.
[Also Read: How To Create A Mobile Gaming App?]
Android Java App Development
Two folders can now be found on the left side of your screen. You’ll be able to access your app’s source code through one of these two folders. It’d be MyFirstJavaApp in this scenario. Android Studio Java uses Gradle Scripts, a free tool, to generate.apk files from your app’s source code in the other folder.
Your app’s code may be found by clicking on the MyFirstJavaApp folder and then selecting View Source. Then you select the java app folder by clicking on it. Manifests, java, and res are the three folders in this directory where the various parts of your project are stored.
Res contains a file named activity_main.xml, from which you can launch the game. The main Activity’s layout can be accessed by clicking on this file. It will look like this on the screen:
_11zon.webp)
ConstraintLayout is the root of the hierarchy, and you can see it on the screen in our choice of empty Activity. ‘Hello World’ appears in the TextView element. The constraint layout serves as a container for your Activity’s many components, helping to keep them all neatly grouped together.
The layout of your Activities can be changed in two fundamental ways:
- The layout.xml file can be edited using the GUI. Creating a java app is as simple as dragging and dropping the elements you want. The Design tab at the bottom of the window gives you access to this choice, which is the default.
- Editing layout.xml files can also be done directly by clicking on the Text tab. Your app’s layout is created from scratch here rather than by dragging and dropping elements.
In the first way, if you are a beginner who wants to learn how to write java program using Android Studio, this is the best option for you. The second approach, on the other hand, is ideal if you enjoy programming code and want to improve your app-writing skills.
Making Your First Java App Changes
You now have a wide range of choices. Try a few tweaks to the TextView to see what happens. If you open a code editor, you’ll see something like this in the TextView element’s code:
android:text=”Hello World!”
Let’s replace it with:
android:text=”First App+”
Changing the color and style of the text is also an option, but I’m not going to do that here. However, you’ll notice that I’ve bolded the text. Let’s see how it looks on the AVD or the device.
_11zon.webp)
Here is the code for these changes:
_11zon.webp)
Drag and drop a button from the Design tab into your app, changing the word “Subscribe” into its text.
_11zon.webp)
Here’s the code this generates:
_11zon.webp)
Using the limitations available in the Design view, you can place your app’s various buttons and text elements where you want them to appear.
[Also Read: Mobile App Development Process]
Making Your Java App Interactive
Our Java app has a button, but nothing happens when the user clicks on it up to this point. Assigning a function to a user’s tap on it is the only way to make it intractable. We’re finally going to get down to developing some Java code here.
Let’s imagine you want to notify your subscribers that they’ve successfully signed up for the First App+ newsletter. As a result, you want the message, Welcome to the First App+ Newsletter, to appear when users click on the Subscribe button.
As an example, consider the following syntax:
_11zon.webp)
In the AVD, it will look like this:
_11zon.webp)
To make it easier to refer to buttons in your app’s Java code, give each one an id.
Conclusion
We learned how to use Java to create a small Java app in this tutorial. The ease with which Java mobile applications can now be developed with Android Studio is quite astonishing. To become an expert Android Java application developer, you’ll need to put in the time and effort required.


